Audio
Wyatt Borden
Why Have Audio?
Developing an operating system is a rather monstrous task with many features that are absolutely necessary for the OS to be useful. Audio is not one of those features, so why provide support for it? Surely if you have worked on a large project, like an OS, you have gotten the most satisfaction when you see the project have some kind of output. In our case the output we would have liked was to hear something. Plus, who wouldn’t love to have an iconic sound play when the OS boots up? Another reason we decided to support audio was because one of our teammates previously inmplemented an Intel High Definition Audio (HDA) driver as a final project as a part of CS439 with Dr. Gheith.
What Hardware to Support?
At the beginning of the project we chose what hardware to write drivers for based on the laptop that we were originally targetting to run on. However, at the point we decided to start working on audio, we fully accepted that we were not going to run on hardware. This meant we could write drivers for whatever hardware was supported on qemu. Having a teammate who previously implemented an Intel HDA driver meant that we really only had one choice of the hardware to support. Luckily, our target laptop seems to actually use an Intel HDA audio device. Another upside to choosing this device is that it seems reather simple and we had access to the specifications for it.
Structure of the Intel HDA
The specification we used while implementing our driver was the High Definition Audio Specification Revision 1.0a. Another resource we used was the OSDev wiki for the Intel HDA, although I believe this entry leaves much to be desired and I may contribute to this entry when I have more time. The main part of the device that you will communicate with is the controller, which is done through a set of memory mapped registers. Luckily, setup and communication with the controller is rather simple, however the majority of the action is done by the codecs. You communicate with the codecs by sending on the Command Output Ring Buffer (CORB) and recieving responses on the Response Input Ring Buffer (RIRB) using DMA. A codec typically represents a connection to an actual device connected to the machine (things like speakers or microphones). The way audio data is communicated with the codecs is with streams which are either input, output, or bidirectional.
Codec Architecture
Each codec is characterized by a set of nodes organized in a hierarchical tree structure whith a single root node. The root node provides “pointers” to the next level of nodes with compromises the function group(s) that comprise the codec. A function group is a collection of modules with a specific purpose, these modules are called widgets. The function group that we are interested in is the Audio Function Group (AFG). Luckily for us, the HDA implemented in qemu only has one codec and the only function group it has is the AFG. Figure 50 of the HDA specs provides a pretty helpful diagram for understanding the architecture of the codecs.
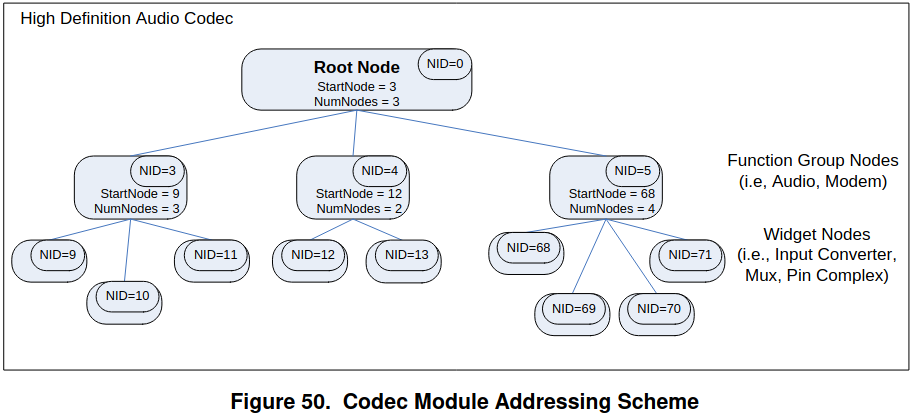
Understanding the structure of the codec is crucial so we know how to determine the capabilities of and configure each codec.
What Our Driver can Do
Taking into account the limited time remaining in the semester, finals, projects, and last minute assignments, we could not spend too much time to make our implementation super robust.
Currently our driver does the following upon initialization of devices:
- Initializes audio device
- Sets some global control registers
- Initializes the Command Output Ring Buffer (CORB)
- Initializes the Response Input Ring Buffer (RIRB)
- Initializes the codecs and finds the proper nodes that we should use for output
- Plays audio as a test, assuming you uncommented the line that does so
Unfortunately the kinds of audio we can play is quite restricted. Currently we can only play small mono wav files. The restriction on size is due to how we load the wav file into our kernel to get the data to play. Currently, we just include the actual data with our kernel when it boots, so we are limited by the size of the kernel heap that we initialize with. This restricts the total size of the files that we can play. To get the files to fit you have the option of either limiting the length of the song or compressing it. There are also many aspects of our driver that are “hard coded” to work with qemu.
Challenges we Faced
Most of the challenges we faced were due to the lack of debugging information the qemu provides for the sound card. We got around this by compiling the qemu source code enabling some debug information that is normally not printed. Qemu also does not fully implement the hardware, some commands that are supposed to change things in the hardware just simply don’t do anything. However, this is only a small issue that only caused trouble once.
One other thing that we struggled with was reading the specifications and determining the different commands that can be used.
The OSDev wiki entry does list some verbs, another term for commands, but the way the data should be formatted and how the response look are underspecified. We did eventually did find the definitions for the verbs in the specs in section 7.3.3.
Another challenge was the code we were referencing was very hardcoded and took many shortcuts.
Initializing the Device
Finding the Device
Finding the device on the PCI is pretty straightforward, you just need to get a list of the devices and look for the one with class code of 0x04 and a subclass of 0x03. After you get that you should read the config to get the base address and then map the pages for MMIO.
Initializing the Controller
Initializing the controller is also very easy. All of the register offsets and the purpose of each field is listed in the specs in section 3.3. The OSDev wiki entry also list many registers, however one thing to be careful of is the entry does not list the full size of some registers, it chooses to neglect some bytes that are reserved and zeroed out.
- Reset the controller by setting the Controller Reset (CRST) bit of the Global Control register.
- Make sure to wait a sufficient amount of time for codecs to wake up.
- Also unset the CRST bit once you read a 1 from that bit.
- Initialize the CORB and the RIRB.
- Stop the DMA engines.
- Determine the proper size of each buffer by reading the registers.
- Allocate the buffers and write the physical addresses to the base registers.
- Initialize the write and read pointer registers.
- Start the DMA engine of each ring buffer.
- If you want to support interrupts, enable the interrupts by setting the proper bits in the interrupt control register
Setting up the AFG Codec
This is the hard step and requires a strong understanding of the structure of the codecs. We followed the steps listed on the OSDev wiki to correctly initialize the codec.
- For each codec get the number of function groups and the start node id (NID) using the GetParameter verb with the proper data on the root node (NID 0).
- Figure out which node is the AFG by using the GetParameter verb with the proper data.
- Loop through all of the widgets in the AFG collecting the widget types and configuration data that we will need later.
- Figure out what nodes have an output device attached to them.
- Find and store the paths that attach these output nodes to DACs.
- The section on OSDev labeled “Finding all useful paths through the codec” provides a useful algorithm for this.
The OSDev wiki had a couple more steps but we were able to get away with mainly using the steps outlined above.
Playing Audio through a Stream
In order to play audio you need to configure a stream descriptor with a Buffer Descriptor List (BDL) and tell the audio output node the format of the audio data and the stream number the data is on. To configure the stream descriptor you essentially just need to go down the list of the registers in the stream descriptor and fill out all of the necessary data. Once this is done and you turn the stream on, by setting the run bit of the stream descriptor control register, you should hear audio.
What’s Next?
Even though we can play audio, I am a little unhappy about the state of the code. I would like to refactor some of it to remove some unused parts/use some things that we should be using.
As previously mentioned, we use double buffering to play files that exceed one full BDL. This leads to a small blip in the audio when we are switching the buffers. After doing a little bit of reasearch, it seems that the way it should be done is by filling in entries that have already been read as the audio plays. This works because when the stream reaches the last entry of the BDL, it loops back to the first entry and continues.
Our driver also doesn’t properly use interrupts, we just continuously check the status of the stream description looking for when the interrupt on completion bit is set. I would like to get interrupts properly working so our driver doesn’t just wait for the audio finishes.
I would also like to give users the capability to play sounds using our device (that way if we get Doom running we can have audio). I am not 100% sure how Linux does this, but I believe you just use the filesystem syscalls to open devices as a file and then write the data you want to play.
Conclusion
Over the course of this project I learned a lot about how device drivers actually work. Even though none of the device drivers I helped with are particularly robust, I believe that I have learned enough to add the right features to properly integrate the drivers with the rest of the OS. One thing that was surprising to me was that telling the device what to do was actually not that hard. That part was relatively simple assuming you have access to the specifications for the device.
If you have any questions about the HDA driver or just drivers in general, you can contact me at [email protected].